
Adding structured data to your personal website will allow Google and other search engines to show rich snippets for your site. This is especially important on your homepage to promote your content. You can use a variety of markup to your page to add person structured data providing a lot of extra bot-readable information to make the page more useful for search engines, and the main way to do this is through Schema.org. This is a collaboration between Google, Yahoo! and Bing to provide a standard for extra markup to pages, but the markup can be confusing.

If Google understands the content on your pages, we can create rich snippets—detailed information intended to help users with specific queries. These rich snippets help users recognize when your site is relevant to their search, and may result in more clicks to your pages.
Schema.org provides structure for markup of pages containing information about people, allowing person structured data to be added. A lot of information can be marked up on your page within the Person itemscope, but these are the main properties which you should mark up:
- name (or givenName and familyName)
- url
- image
- jobTitle
Adding Person Structured Data
Begin by making sure that all the content that you want to mark up is included in the page. Here is an example page that I will markup for this article:
<body>
<h1>George Garside</h1>
<h2>Student</h2>
<img src="photo.jpg">
<p>[email protected]</p>
<a href="http://georgegarside.com/">georgegarside.com</a>
</body>Code language: HTML, XML (xml)
This is a very simple page that contains a heading with the name of the person, a subheading with the job title, a photo, an email address and a URL. This is obviously a very simple page and your page will be more complicated, but this basic page will demonstrate the method which can be adapted for your own page.
The type of item that you will be marking up on the page must be defined by setting the item type by adding attributes to the tag which wraps the content, which in this case is the body tag:
<body itemscope itemtype="https://schema.org/Person">
<h1>George Garside</h1>
<h2>Student</h2>
<img src="photo.jpg">
<p>[email protected]</p>
<a href="http://georgegarside.com/">georgegarside.com</a>
</body>
Next, the actual content can be marked up. The simplest content to markup is text, using itemprop attributes on the tags with the content that you wish to mark up. Spans are recommended, but not required, so you do not need to change the actual structure of your page to add markup. I will add markup to my name, job title and email address:
<body itemscope itemtype="https://schema.org/Person">
<h1 itemprop="name">George Garside</h1>
<h2 itemprop="jobTitle">Student</h2>
<img src="photo.jpg">
<p itemprop="email">[email protected]</p>
<a href="http://georgegarside.com/">georgegarside.com</a>
</body>
There’s another thing to note before we move on—the name can be marked up further, using givenName and familyName. This is not absolutely necessary, but does add extra information for the search engines to use in the future (I’m not aware of any rich snippets that use givenName and familyName over the more general name, but things can change in the future).
<body itemscope itemtype="https://schema.org/Person">
<h1 itemprop="name">
	<span itemprop="givenName">George</span>
	<span itemprop="familyName">Garside</span>
</h1>
<h2 itemprop="jobTitle">Student</h2>
<img src="photo.jpg">
<p itemprop="email">[email protected]</p>
<a href="http://georgegarside.com/">georgegarside.com</a>
</body>
Photos and URLs are slightly different, but still easy to mark up. URLs are marked up like text, but in anchor tags with href attributes. Photos can use ImageObject to define it, or simply by marking up an img. It’s also a good idea to add an alt attribute to the image for Google to understand the content of the image with words. ImageObjects can also contain captions, custom thumbnails and more. For more information about ImageObject, see schema.org/ImageObject.
<body itemscope itemtype="https://schema.org/Person">
<h1 itemprop="name">
	<span itemprop="givenName">George</span>
	<span itemprop="familyName">Garside</span>
</h1>
<h2 itemprop="jobTitle">Student</h2>
<img src="photo.jpg" itemprop="image" alt="Photo of George Garside">
<p itemprop="email">[email protected]</p>
<a href="http://georgegarside.com/" itemprop="url">georgegarside.com</a>
</body>
The finished code snippet:
<body itemscope itemtype="https://schema.org/Person">
	<h1 itemprop="name">
		<span itemprop="givenName">George</span>
		<span itemprop="familyName">Garside</span>
	</h1>
	<h2 itemprop="jobTitle">Student</h2>
	<img src="photo.jpg" itemprop="image" alt="Photo of George Garside">
	<p itemprop="email">[email protected]</p>
	<a href="http://georgegarside.com/" itemprop="url">georgegarside.com</a>
</body>Code language: HTML, XML (xml)
Testing Person Structured Data
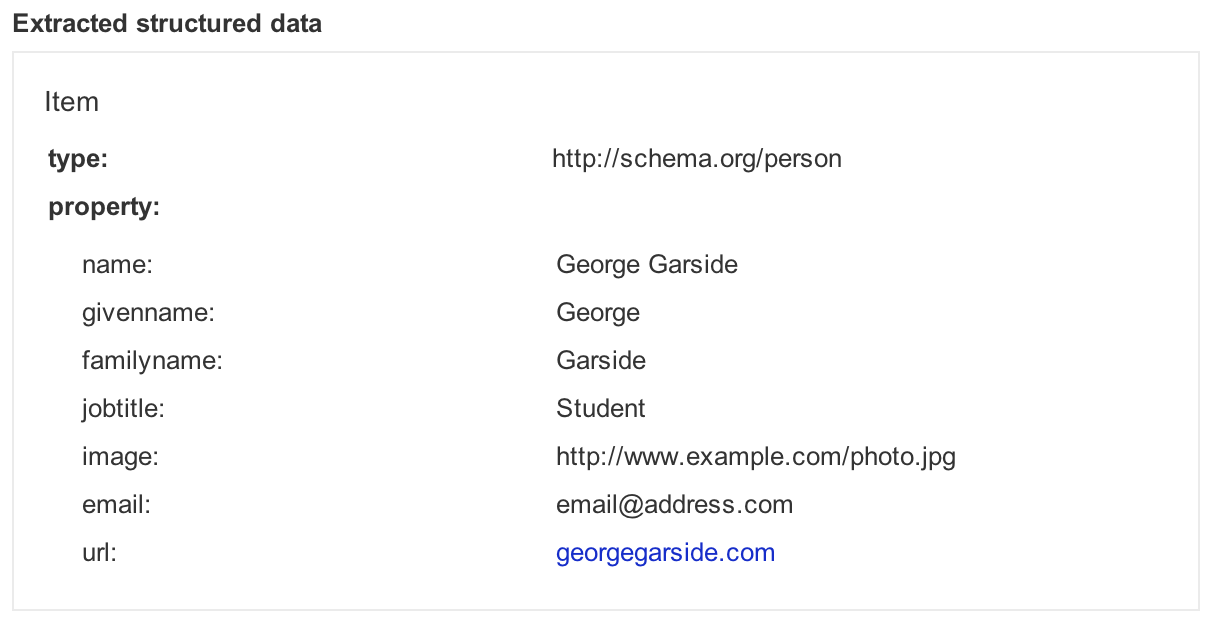
Person structured data, along with all other structured data, is shown in Google Webmaster Tools under Search Appearance → Structured Data next time the page is crawled (use the Fetch with Google tool and submit the page to the index), but you can test it immediately with the Structured Data Testing Tool. Using the HTML upload and previewing the above shows the metadata that Google can extract from the page.
That’s it! Fetch your webpage with Google and submit it for crawling, then wait for Google to crawl the page. Once this is done, it takes a little while for Google to update the Webmaster Tools, but once it has, you will see the structured data shown in Google Webmaster Tools → Search Appearance → Structured Data.